Do-It-Yourself-1: Welcome, Young Mathematicians, to Our Rounding Adventure!
Hello everyone! Today, we’re going to unlock a super useful math skill called rounding. Imagine you need to quickly guess how many candies are in a jar, or how long it will take to get somewhere. Rounding helps us make smart, quick estimates! We’ll be learning about “Rounding to the nearest 10 and 100” using a special method called CPA: Concrete, Pictorial, and Abstract. This means we’ll start by building something with our hands, then draw pictures, and finally understand the formal math rules. Are you ready to dive in? Let’s begin by building our very own “Rounding Runway”!
Do-It-Yourself-2: Concrete – Build Your Own Rounding Runway!
Let’s get hands-on and create a physical model that will make rounding super clear. This model will help you see how close a number is to the nearest 10 or 100.
Materials You Will Need:
- A piece of string or yarn (about 1 meter long).
- Small paper squares or sticky notes.
- A marker or pen.
- Two small clothespins or paper clips.
- (Optional: A ruler or measuring tape for accuracy).
Instructions for Building Your Rounding Runway:
- Set Up Your Number Line: Stretch your string tightly between two points. You can tape it to a table, hold it between two objects, or even have a friend hold it! This string is your number line.
- Mark Your “Tens” or “Hundreds” Benchmarks:
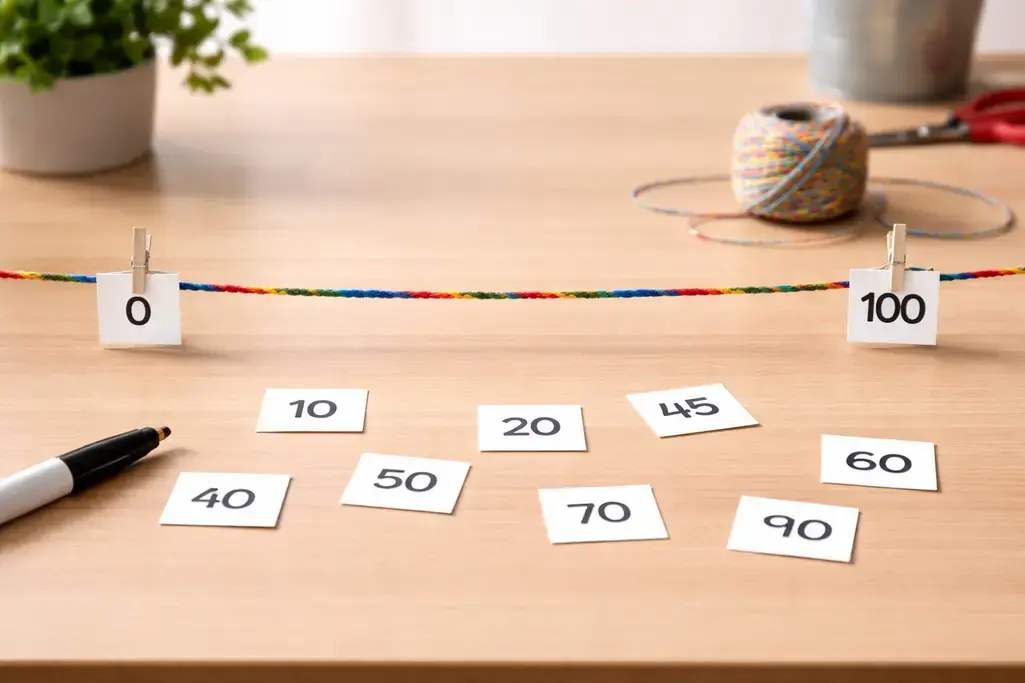
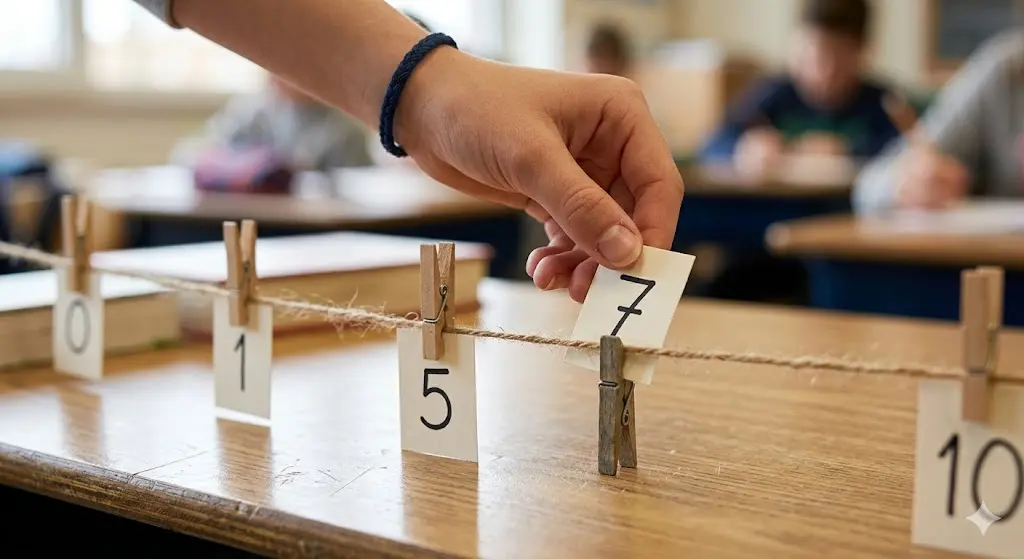
- For rounding to the nearest 10: On one paper square, write ‘0’. On another, write ’10’. Attach these with clothespins to the very ends of your string. These are your “tens” benchmarks.
- For rounding to the nearest 100: On one paper square, write ‘0’. On another, write ‘100’. Attach these to the ends of your string. These are your “hundreds” benchmarks.
- Find the Midpoint – Your Decision Spot!
- For rounding to the nearest 10: Find the middle of your ‘0’ to ’10’ string. What number is exactly in the middle of 0 and 10? Yes, it’s 5! Write ‘5’ on a small paper square and attach it right in the middle. This is your crucial “midpoint.”
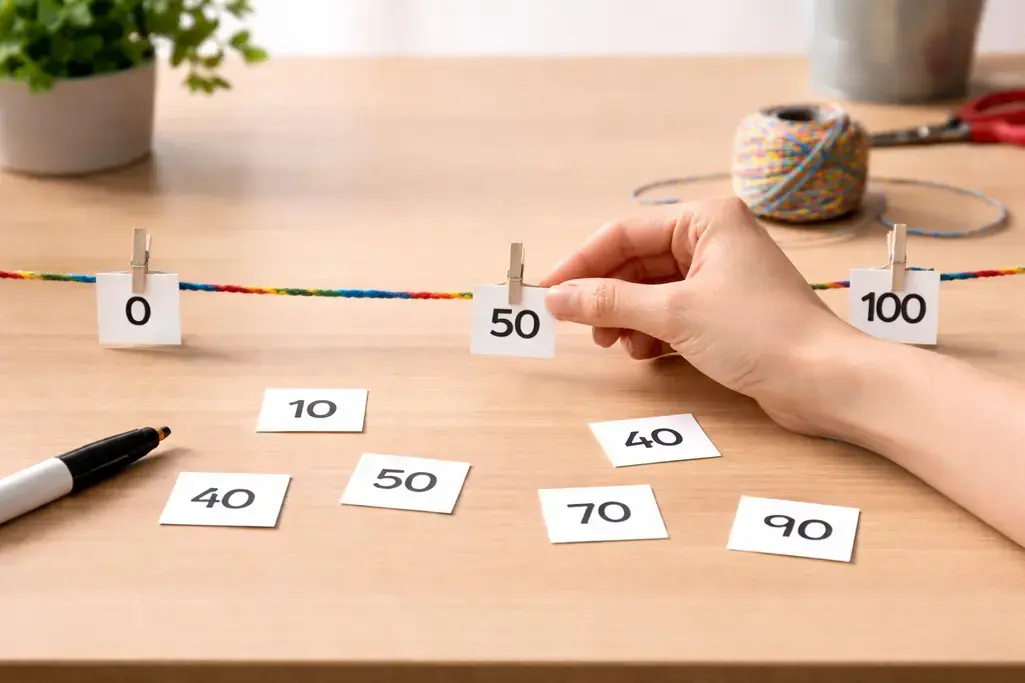
- For rounding to the nearest 100: Find the middle of your ‘0’ to ‘100’ string. What number is exactly in the middle of 0 and 100? Yes, it’s 50! Write ’50’ on a small paper square and attach it right in the middle. This is your crucial “midpoint.”
Build your own model.
Do-It-Yourself-3: Concrete – Practicing with Your Rounding Runway!
Now that your Rounding Runway is built, let’s play! This is where you physically interact with numbers and see rounding in action.
Instructions for Playing and Learning:
- Prepare Your Numbers: Write various numbers on individual small paper squares. For rounding to the nearest 10, use numbers like 2, 3, 4, 6, 7, 8, or even bigger numbers like 23, 27, 45, 49. For rounding to the nearest 100, use numbers like 20, 30, 40, 60, 70, 80, or bigger numbers like 120, 150, 180, 249.
- Place Your Number: Take one of your number cards. If your runway is from 0 to 10, try placing ‘3’ on the string. If your runway is from 0 to 100, try placing ’30’.
- Observe and Decide:
- Look at where you placed the number. Is it closer to the ‘0’ end or the ’10’ (or ‘100’) end?
- Pay special attention to your midpoint (5 or 50)! If your number falls before the midpoint, it rounds down to the lower benchmark. If your number falls at or after the midpoint, it rounds up to the higher benchmark.
- Practice Rounds!
- Try rounding 7 to the nearest 10. (Place ‘7’ on your 0-10 runway. Is it closer to 0 or 10? Past the midpoint ‘5’? Yes! So, 7 rounds up to 10.)
- Try rounding 30 to the nearest 100. (Place ’30’ on your 0-100 runway. Is it closer to 0 or 100? Before the midpoint ’50’? Yes! So, 30 rounds down to 0.)
- What about 5 on the 0-10 runway? Where does it go? Remember the rule for the midpoint!
- What about 50 on the 0-100 runway? Where does it go?
Keep experimenting! This physical model helps you build a strong understanding of what “closer” really means in rounding.
Design-It-Yourself-1: Pictorial – Visualizing Rounding to the Nearest 10!
Fantastic work with your physical models! Now, let’s transition from your hands-on experience to seeing these ideas on paper. We’ll use diagrams to draw what you just built and experienced. This helps us visualize the logic.
Imagine a number line like the one you built:
- Understanding the Number Line for Tens:
- Numbers live on a line, and each number has neighbors!
- When rounding to the nearest 10, we’re looking for the multiple of 10 that is closest (like 10, 20, 30, 40, etc.).
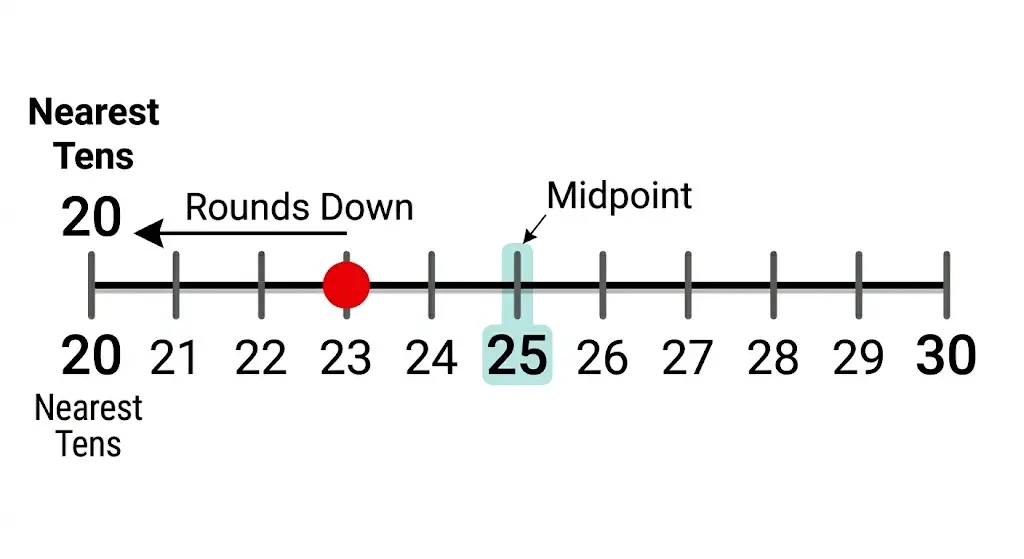
- The “midpoint” is super important. For any set of tens, the midpoint is the number ending in ‘5’. For example, between 20 and 30, the midpoint is 25.
- Numbers before the midpoint always go down to the lower ten.
- Numbers at or after the midpoint always go up to the higher ten.
Let’s look at an example: Rounding 23 to the nearest 10.